Wednesday, January 11, 2012

14 months

On Monday, our littlest princess turned 14 months old.  All of a sudden, the baby look is starting to slip away and the toddler in her is coming out in full form.


To say that she is outgoing would be an understatement.  She says Hi to everyone that she comes into contact with or sees on the TV.  She adores her big sister, milk, food and her doggies.  If she had it her way she would eat and play outside all day long.  She loves the backyard.  She loves the slide.  She loves the swing.  But mostly, she loves being able to be free to run as much and as fast as she can.

She is talking up a storm.  She says "More" (and sounds EXACTLY how Kaitlyn did!  It's crazy cute and creepy), Diaper, Poo Poo, MaMa, Daddy, Cookie (all day long if she could lol), I Love You, Night Night, Dog, Bye, What's That and some form of sister and Kaitlyn.  She tries to say everything we do, when she feels like it.

It does look like she may have chipped a tooth :(  I have no idea when though. The kid is so clumsy and falls ALL the time.  Usually face first and she hasn't quite figured out to put her hands out first (good thing maybe?).  She just really wants to run and her teeny little feet don't know how to keep up with that running.  And she bites on everything, just to be sure it isn't food.  We have a dentist appointment next week to see what their thoughts are. 


Yeah, I know it's blurry, but it gives you an idea.  And here is our brave girl tackling the slide.  You can totally see this better if you move your head 90 degrees and you'll enjoy it best if you are a lover of the Blair Witch Project.  Thank you camera woman Kaitlyn.


Samantha is weighing in at 21 lbs and 8 oz  and she's 31" tall.  Which is 37.2% for weight (which is crazy to me because she feels SOO heavy!) and 79.9% for height.

She's back to sleeping through the night.  We have to let her cry it out at night.  She hates that.  And I am surprised that she can still cry for 25-45 minutes before going to sleep :(  She does it at nap time too :(  I look forward to her enjoying going to sleep as much as she enjoys eating!  Maybe I'll have better to report next month.  Until then, I'll leave you with a picture of Miss Kaitlyn.

Monday, January 9, 2012

Word Art

Word Art has been some of my favorite projects right now!  I wanted to share some of the ones I've made :)


March for Babies 2012 Shirt Design

I'm excited and proud to say, our 2012 March for Babies Team shirt design is ready!

Here is the front:


And here is the back:


I'm also debating creating an iron on patch to put on the sleeves to celebrate this being our 5th walk!  Do you March for Babies?  I'd love to see everyone's team shirt design!  Interested in being a part of Matthew's Team?  Like us on Facebook for more details!

Saturday, January 7, 2012

Yummy, Good for you Chili

Dusty wants to work on healthier habits this year and gave me free and full rein on all the menus and menu planning!  While I love the control, it has been a little bit overwhelming.  Especially since I'm trying to help him stay full and calories in check.

So far this week has been ok.  Most meals have been pretty ok.  The hardest part for me is dinner.  I don't want to cook more than one dinner and while Kaitlyn isn't necessarily picky, she can be.  Monday's dinner was as simple as tacos but the meat replaced with lean turkey and went heavy on the veggies.  A side of black beans and the meal was good for you and filling.

Tuesday night we had pasta with chicken.  I took a chicken breast (boneless, skinless) and smashed the heck out of it with a mallet then lightly dusted it with wheat flour, oregano and salt and pepper.  I browned it in olive oil, removed it out of the pan and cooked some mushrooms in with water and a bit of brandy and garlic.  Once it was nice and going I returned the chicken for about 20 minutes and served it with whole wheat pasta. It was under 500 calories a serving and it kinda tasted that way.

Wednesday night was my FAVORITE.  It was really tasty, everyone liked it, even Samantha.  And, it was only one pot, so yay!  So, I'm sharing the recipe :)

What you'll need:

1 lb ground extra lean beef (can leave out or substitute with turkey)
1 table spoon olive oil
1 onion
2 carrots
1 green bell pepper
4 cloves of garlic (finely chopped or minced)
2 tomatoes
2 14.5 cans of black beans - drained
chili powder

In a stock pot, brown the beef.  Drain off all excess fat and remove beef from pot.

In the same pot, add the olive oil and onions and garlic to sweat.

While the onions and garlic are cooking, peal the carrots and add them with the bell pepper and tomatoes to a food processor and chop it all up nice and fine.

Add the remaining veggies and black beans to the pot with  about a tablespoon of chili powder.

Cover, reduce heat to low and cook for 45 minutes.

This made enough for 6 large servings and we were all full after.

In addition to being easy, each serving only had 275 calories, 8.5 grams of fat, 43 mg of sodium and 24 grams of protein.  (and of course, my math could be offer, we've mostly just been watching calories).

Friday, January 6, 2012

March for Babies

June 2, 2007 we were a happy, blissful, naive family.  Our daughter, Kaitlyn had turned 2 1/2 the month before, we were happily married and I was 23 weeks pregnant with a little boy we had decided to name Matthew Jackson.  My belly was rapidly growing, we had been enjoying the summer and all the heat that it brought, I was managing an apartment complex and our dog was going to turn 4 at the end of the summer.  All was well.  Nothing in the world could possibly go wrong.  Life was fantastic.

I went to bed around 10 that night and within 12 hours, things were not so perfect.

My water had broken in the night, it was confirmed after an emergency trip to Labor and Delivery.  I was laying in a bed, when the perinatologist came in with her recommendation.  We should induce labor to reduce the risk of infection, since my body was going to force it soon anyways, and have a peaceful goodbye to our son.  I couldn't.  How could I give up hope based on the words of just one woman.  I didn't care what kind of degree or education she had.

10 weeks of strict hospital bed rest and our lives turned completely upside down.  By the last few weeks he had measly a pocket of fluid near his mouth to help him grow and teach his lungs to work.  Then, he decided he was ready to be born.  That same doctor was in the room when he cried.  A sound she said he would never make, the breaths she said would be limited to just a few in his lifetime.  He was born.  He was there.  He cried.  He was alive.

Thanks to a nearly 4 week NICU stay, the amazing staff and the advances in medicine we brought Matthew home.  He saw his nursery that we worked so hard at.  He cuddled with his sister as she read him stories.  He had diaper changes, late night snuggle sessions, learned to breast feed, see the park, walk through the outdoors, visit the pumpkin patch and meet so much of the family that loved him and expected to watch him grow.

Often, I've been asked if we would have chosen differently on June 3rd had we of known the outcome.  Would we have spared ourselves the pain of the sudden loss after the long hospital stay, the sacrifices, the roller coaster of the NICU, and the trauma we went through the morning of October 15.  The answer is an easy No.  I would have done double, triple or infinity times that length of time standing on my head if it meant just one moment with him.  Those 10 weeks and the memories created in them have to last us a lifetime.

A decade or two ago, we wouldn't have had those 10 weeks.  The medication and techniques he needed to survive the first month of his life, just were not available then.  The medications and techniques used to save his life are available because of the work the March of Dimes does.  That is why we started walking.

The March of Dimes is also responsible for the research that encouraged the use of the medication we used to get Samantha to full term in pregnancy.  Without the p17, she may not be here at all.  That is another reason we walk.

Around the country, every year the March of Dimes hosts March for Babies.  March for Babies raises funds and awareness in the community to save the most innocent, babies.  The money raises stays in our community for research, for health, for babies everywhere.  We walk so more babies can go home healthy to be with their families.  We walk because no parent should ever have to pick out tiny suits, tiny dresses or tiny coffins. No parent should ever have to take a "Baby's 1st Christmas" bib to the cemetery.  We walk to save lives.

You can help. In so many ways.  Below, I'll share them with you.

1. You can join our team.  This is our 5th year walking, which I think is amazing and awesome.  To join our team, you just have to go here and sign up!

2.  You can donate to our team!  Our goal this year is $10,000.  I'm happy to raise that $1 at a time!  Just go to our team page to donate!

3. You can like our facebook Team page:  Matthew's Team and share with your friends to spread the word.

4. You can buy a team shirt!  The way I do them is I create the design and high quality transfers.  I sell them for $5 with all $5 going straight to our team.  I send instructions on how to put them on your shirts with the shirts.  I do it this way because it's so much easier and cost effective that getting everyone's sizes and waiting for the printed shirts to come in, and this way you can pick if you want it V-neck, long sleeve, short sleeve and so on!  Designs will be ready by next month!

5. You can buy a ticket to our Taco feed and Auction Night!  Details are coming soon!

6. You can donate a prize to our Auction (value $50 and higher) or Raffle (value $10-$49)

7. You can start your own Matthew's Team in your area!

Raise money, Raise Awareness and Raise Hope!

Thursday, January 5, 2012

The Tie Bib Tutorial

I want to start blogging more.  About everything.  About our journey, about our family, about things that I have passion about and the things that tick me off.

Have you ever gotten an idea on how to make something and become so excited about it, that you went straight home after the gym and started, only breaking when your "time to go and get the oldest from school" timer goes off, and you rush out the door with your toddler only to get there and realize that you still have your gym clothes on....  Yeah, me neither :P  Until this bib.

I've been making baby tie onesies for a while, and love them.  But, I wanted something a little different.  I also just got a new silhouette cameo machine, which inspired me to clean out my craft section and discover all the scraps I had and needed to start using if I want to buy more, and actually have room for it.

As I created, I took pictures.

If you want this in just 13 super easy steps:


you'll need to start out with the following materials:

* Bib you love the shape of
* Material for the front (amount will depend on the size you're making, but a fat quarter should be plenty, for this project, I used cotton)
* Material for the back (same amount as for the front, I used minky for this, but terry or chenille or towel just hanging out would be great too!)
* Coordinating Fabric for the tie (like an 1/8 of a yard will make a couple, this is a perfect scrap opportunity. For this, I used fleece, but cotton would be great too)
* Velcro (or snaps)
* Heat'n Bond (or something similar)
* Sewing machine and basic notions (thread, pins and so on)
* A tie template cut out of cardstock (I free handed my design, then folded it in half to shape it so it was even on both sides)

Step One:  Take your material, layer it right side together and pin your bib template on top of it.  Minky can be a tricky little stinker, so be sure that you use plenty of pins so it doesn't shift on you.  You might notice that my top piece is two pieces sewn together.  I really wanted to to use this fabric and while it was pretty wide enough, it wasn't tall enough.  So, I sewed them together and then arranged the top of the bib "template" to where the straps would start.


Step Two: Now that they are pinned nice and securely together, cut out your fabric.  Add about 1/4" to the entire design to give yourself a seam allowance.


Step Three.  It's all cut out!  Yay!  Remove the pins and admire the hardest part (in my opinion) of the whole project.


Step Four:  Now it's time to separate the pieces and add your velcro.  Remember that the pieces are going to be opposite once they are sewn together.  So, attach your velcro to what looks like the same side of each of the pieces.


Step 5:  Sew the velcro to your front and back pieces.


Step 6:  Now we start my favorite part!  Making the tie.  The first part of this is to iron your heat'n bond to your tie material.


Step 7:  Lay your awesome tie pattern piece on top of the heat'n bond material side and trace it before cutting it out.


Step 8:  Admire your awesome tie and lay it on top of your bib.  Adjust it so it looks how you like it.  I like to tuck the bottom under the top just slightly.  Also, when you iron it on, be sure to take into consideration your seam allowances.  I ironed mine on about 1/2" under the top center.  I also eyeballed it.  If you want it perfect, fold the top of your bib in half vertically and and iron it to find your center to put your tie on the center.


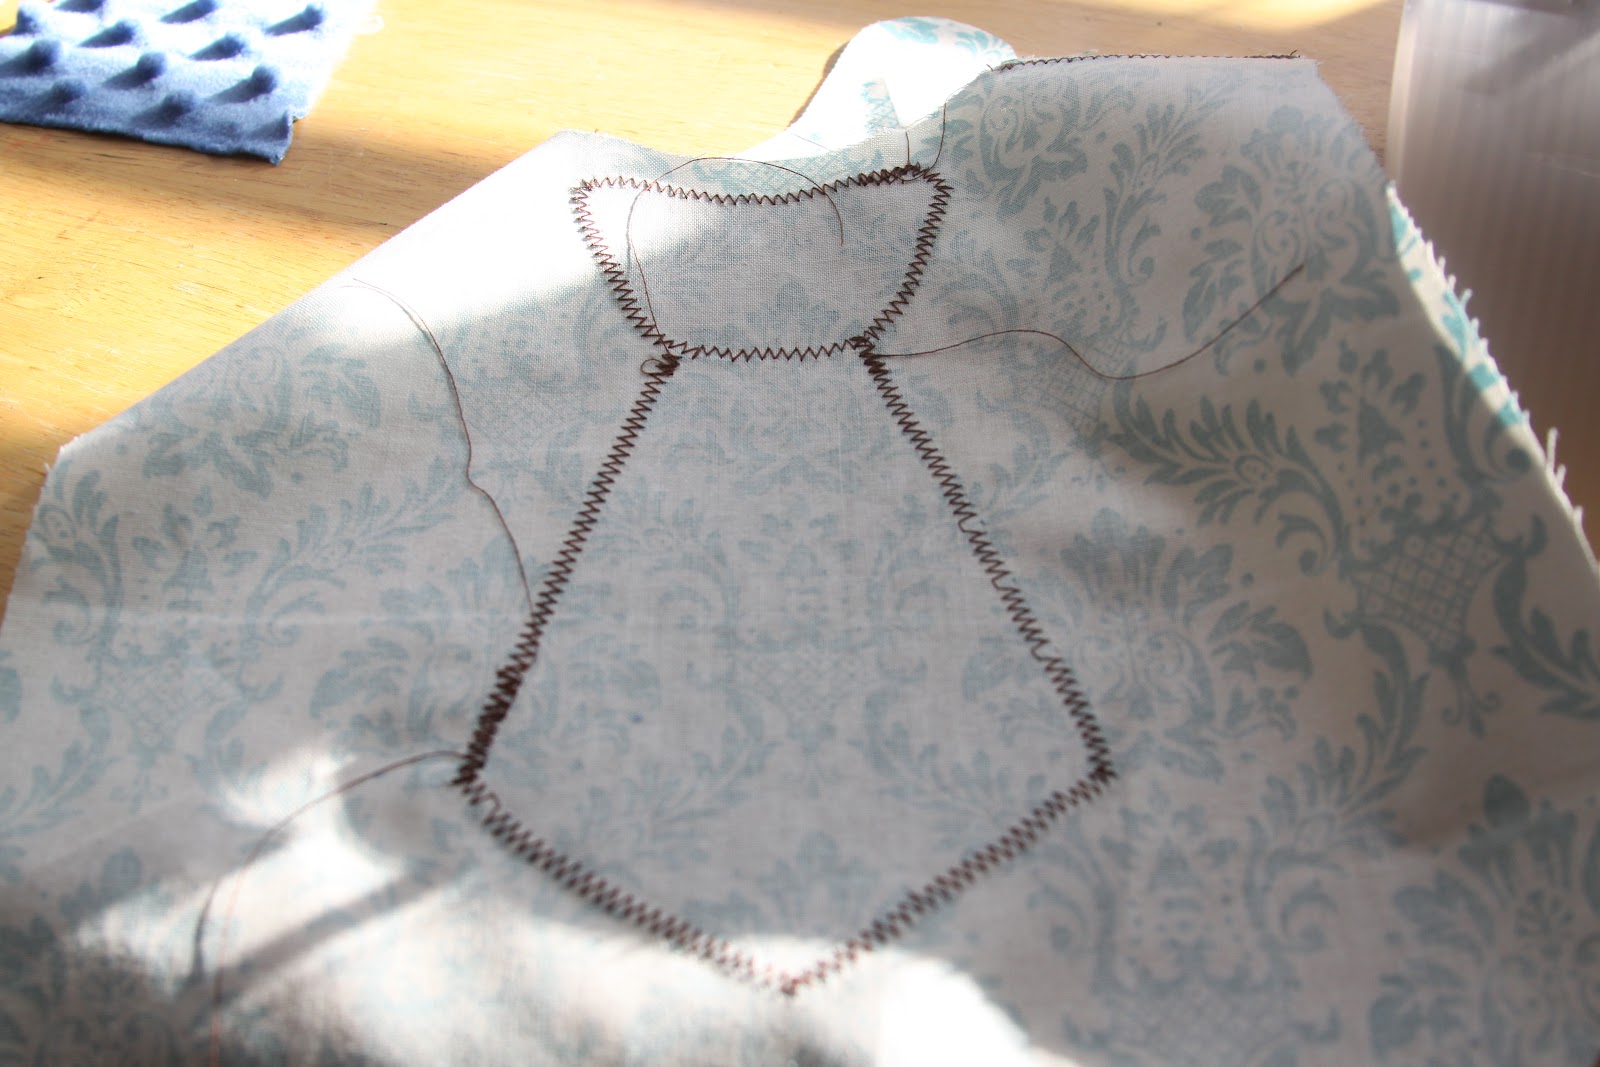
Step 9: Take your awesome bib over to your trusty sewing machine.  Using a zig zag stitch, permanently adhere your tie to your bib.  I used to hate appliqueing.  Then, I learned to sloooooooow my machine down.  It isn't a race, if you go slow, your machine won't get confused and skip stitches, plus it'll be easier to stay straight and look nice.


This is how the back of your tie may look.  As you can see, I tried rushing in some places and ended up having some stitches get skipped that I had to go back and fix.


Step 10: Trim your threads and then pin your front and back pieces together.  You will want to be sure that you leave an opening to be able to turn your bib right side out.  To do this, I use two pins close together to scream "Hey, stop sewing!" at me.


Step 11:  Sew all the way around, leaving your opening open.


Step 12: Turn your bib right side out through the opening.  To help turn the corners and push all the pieces out, grab a chopstick and push it through.  Once you do that, pin the opening closed and top stitch your bib.  I did 1/4" seam for the top stitch.


Step 13:  Admire your handy work.  Find a cute little neck to wrap it around :)


Enjoy!

Wednesday, January 4, 2012

Lets Talk Potty Training

Kaitlyn potty trained on her third birthday.  Far later than I wanted her too, but she didn't start showing signs of being ready until about 2 1/2, and that was about the time I was hospitalized for the last 10 weeks of my pregnancy with Matthew.  Then, the roller coaster of the NICU, and the adjustments of bringing him home, and then his passing all made it too much to throw potty training in as well.  The plus side of waiting so long was that she was trained in about a day.  She had to choose, diapers or a birthday party, since her birthday party included ponies she gave up the diapers.

Samantha is only a few days away from being 14 months old.  But, she tells us when she "poo poos" and asks for a diaper many times when she's wet, and when she's ready to be changed, she'll walk you to her changing table.  Of course, once there the possibility of her running from you and thrashing during a diaper training is pretty high.  But, she obviously does not like the feel of damp cloth against her (score 1 for cloth and 0 for disposable!) and knows that when it's yucky it's time to be clean.

She's fascinated with toilets.  I mean fascinated.  If doors aren't closed and lids aren't put down every single time you're going to find her elbow deep in the "fun" water of the toilet.  She received a gift card for Christmas and one of the things "she" bought with it was a fun baby potty with her own toilet paper holder and all.  But, she has no interest in it.  Well, that's not entirely true.  She takes a lot of interest in me yelling at Kaitlyn to please get off the toilet and reminding her that she is 7!! years old and does not need a baby potty that forces her knees into her chin, but I digress.

Tell me about your potty experiences.  How did you start potty training?  What was the age?  Were you using cloth or disposable before?  If you're a cloth user did you switch to training cloth or just stick to the same diapers you were using?